 With my post about pixel-perfect guides in Photoshop consistently being the site’s most popular, I thought a new series of Photoshop-related posts might be in order. This will be the first of an irregular series about Photoshop Basics, wherein I’ll talk about some of my most used—but basic—tips, tricks, shortcuts, and skills to help you use Photoshop more efficiently or effectively.
What follows is a smorgasbord of quick tips that, as a web developer, I use nearly every day.
The Marquee tool is your best friend
![]() As I mentioned in the comments on the pixel-perfect guides post, the marquee tool (keyboard shortcut: m) is the most frequently active tool in my Photoshop toolbox. Aside from its utility as a guide-placement aide, I also use it to quickly extract elements from a layout, to measure element size or spacing, or to define crop- and fill-areas.
As I mentioned in the comments on the pixel-perfect guides post, the marquee tool (keyboard shortcut: m) is the most frequently active tool in my Photoshop toolbox. Aside from its utility as a guide-placement aide, I also use it to quickly extract elements from a layout, to measure element size or spacing, or to define crop- and fill-areas.
Element Extraction
The marquee tool is a selection tool, meant to allow you to define a working area. I use it most often to select an element—like thumbnails, buttons, embellishments, bits of backgrounds, whatever—that I need to save as a separate image file.
First, make a selection around the element; it doesn’t have to be precise, you can refine it later. You may also press the space-bar while you’re defining your selection to move it around before committing the size and position. Next, copy (Cmd- C) the selection to the clipboard, create a new document (Cmd- N, Enter), and paste (Cmd- V) the copied element into the new document.
Now you can save or export the element, or, if necessary, you can refine it further using the following cropping technique.
Cropping
The crop tool allows you to alter a crop area after you define it, but for simple crops, the marquee tool is often just as quick, if not quicker, especially if you have assigned a keyboard shortcut to the crop menu item. Cropping, rather than copy/pasting a selection, is an easier way to extract an element requiring transparency.
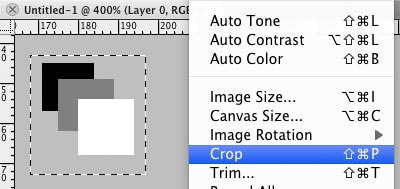
To use this technique, you simply define a selection around your element as above, then select the Crop menu item from the Image menu, or use your keyboard shortcut. If you’re using this technique to preserve transparency around (or within) an element, you should turn off any layers that are visible within the transparent areas before you save or export to a file.
To refine an element I’ve already separated using one of the above techniques, I’ll often Select All (Cmd- A), move the resulting selection down and to the right (using the arrow keys) to where the element’s top and left edges should be, then crop. Then I’ll move the selection up and to the left to where the element’s bottom and right edges should be, and crop again. This may seem a bit fiddly, and unnecessary if you take care when making your initial selections, but you’d be surprised how often a seemingly accurate selection is off by a pixel or two, leaving you to clean it up afterward anyway. Also, dealing with less-well-defined edges, like drop shadows, can sometimes be easier when you’ve already cropped away nearby distracting elements.
Measurements and Spacing
To use the marquee tool for measurements, simply draw a square selection around—or between—the object(s) you need to measure, then check the selection’s pixel dimensions in the Info panel.
If I want to ensure consistent spacing between members of a group of elements, I might draw a marquee the size of the intended white-space, then simply move that selection around to establish or double-check the positioning of the other elements.
If you’re using this technique to establish spacing, it works best to first set all your guides using the selection, deselect it (Cmd-d), then create or move your elements into place. If you’re using it to double-check alignment or spacing, don’t forget to deselect the selection before attempting to move an offending element. If you attempt to move an element while you have an active selection, the move tool will affect the contents of the selection, rather than the layer as a whole, which in this case is probably not your intention.
Filling and Painting
If you want to fill a discrete area with a color (or gradient, or whatever), you can define a selection using the marquee tool and use fill shortcuts (like Cmd-backspace) or the Fill menu item. You can do the same thing to fill an entire layer, by doing “Select All”, but it isn’t necessary since using fill with NO selection automatically fills the entire layer.
Also, when using the various paint, erase, or manipulation tools (smudge, blur, etc.), an active selection will confine their effect, thereby protecting areas of the image outside that selection.
Most of the above tips will work with any of the selection tools, but I typically use the square marquee tool for these since its simple geometry makes it easier to obtain measurements and spacing.
Move Tool for Layer Discovery
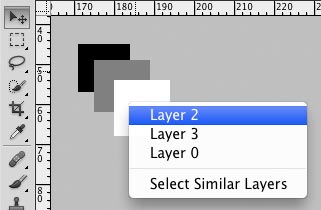
 The move tool also can serve many purposes, one interesting and very useful (but not immediately apparent) one being its ability to help you discover the layer on which a visible element resides. To do this, with the move tool active, simply right-click (or Ctrl-click, I think, for you single button-ers) on the layout element you’re attempting to isolate, and a context menu will pop up containing a list of all the layers which have content under the mouse pointer’s current position.
If your creative designers are cruel, evil people, it may be difficult to figure out which Layer 10, or Layer 10 copy, is the appropriate one. If however, they are caring, thoughtful designers who appropriately name and nest their layers, it should be readily apparent which layer, or at least which layer group, contains your element. Select the layer you think contains your element from the list, and that layer should be selected and scrolled-to in the Layers pallet. You can check whether you picked correctly by clicking the eyeball icon on the selected layer to hide/show it, and see if the element disappears. If not, try a few other eyeballs until you hit the right one.
Quick Trimming and Cropping
 Back when I was forced to use Windows on a daily basis, I could easily jump to any menu item by means of the Alt-key dance. For instance, to initiate the crop menu item, I’d hit Alt, then I, Then P, and it’d be done. I became really good at this, and had several of these menu items committed to muscle memory. I’ve since been allowed to move to Mac, but have yet to discover such a simple way of activating menu items that don’t have pre-defined keyboard shortcuts. Because the lack of shortcuts for Crop and Trim were causing me grief, I’ve set up custom shortcuts.
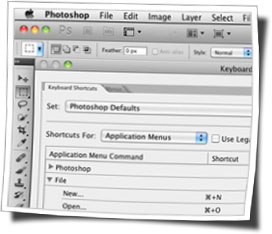
Thankfully, you can easily set your own keyboard shortcuts using Mac’s Keyboard Preferences. I have my Crop menu item setup with Cmd-Shift-P, and the Trim tool with Cmd-Shift-T. Now I can make a marquee selection, hit my keyboard shortcut, and have my crop completed in a fraction of the time it would take me to mouse up to the menu.
Quickly Select a Layer’s Contents
To quickly make a selection around the contents of a particular layer, simply hold down the Cmd key (Ctrl for you PC guys, I think) and click on the layer thumbnail in the Layers palette. Photoshop will create a selection containing all the visible elements on the layer, respecting transparent areas around the outside (which will be partially selected depending on their level of transparency). I believe this works for most layer types, but probably not for all (like effects or filter layers, I imagine).
The More You Know: Keyboard Shortcuts
I mentioned a couple of the custom shortcuts I use, and you may well have some of your own favorite or often-used features that need the same treatment, but Photoshop does have many simple and very useful pre-defined keyboard shortcuts. Some of them, mainly items in the toolbox, don’t even require modifier keys like Cmd, Ctrl, or Alt. Here are the ones I find myself using most often:
- m
- activates the marquee tool
- v
- activates the move tool
- z
- activates the zoom tool
- Cmd-d
- de-selects an active selection
- spacebar
- when using many of Photoshop’s tools, pressing the space bar will temporarily switch to the “hand” tool.
- num keys
- with many of the non-paint tools, hitting a number-key will alter the current layer’s opacity (0-9 for 0-90%, 100 for 100%); while with a paint-related tool, the number keys will usually affect the tool’s opacity.
- Cmd- 0, Cmd- 1, Cmd- +, Cmd- –
- Combined with the “Command” key, the Zero, One, Plus, and Minus keys control the zoom-level of the currently active window. Cmd- 0 (zero) zooms to fit the current file or selection to screen. Cmd- 1 (one) zooms to 100%, or “actual pixels” view. Cmd- + (plus) zooms in, while Cmd- – (minus) zooms out. Cmd- 0 is especially useful, for example, when transforming an item that is larger than will fit within the current viewport—using Cmd- 0 in this instance will zoom out so that all of the transform handles are in view.
- Cmd- ;
- Shows or hides the guide lines that assist in checking—or enforcing—alignment of elements.
- Cmd- Option- Shift- S
- Initiates the “Save for Web and Devices” function, which allows you to export files that are optimized for specific uses. As a web developer, this is the most common way I save files when I’m extracting elements for a new site. (note: I believe this is part of the default keyboard shortcut set on Windows, but it may not be on Mac. Check your setup, and if you’re a web developer, you need a keyboard shortcut for this function.)
I hope that these tips and tricks come in handy, and maybe give you a different perspective on some of Photoshop’s tools. Again, I use many of these tricks every single time I run Photoshop, and I know that learning them has saved me incalculable time and effort.
If you find these—or variations on these—to be useful, I hope you’ll chime in with a comment to let me know how they’ve helped you. If you use other basic things like this that make your life easier every day, and that I didn’t cover, I hope you’ll add them to the discussion as well.